A Light Brunch
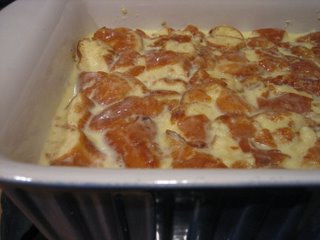
That was the idea anyway...And then I discovered the recipe for Krispy Kreme Doughnut Bread Pudding from Food & Wine magazine. It is as heavenly and rich as its name connotes. My original idea was to have a brunch with a relatively light menu of quiche, fruit salad and maybe some yoghurt. Our final menu consisted of the Krispy Kreme Doughnut Bread Pudding, a fruit salad, a tomato and onion quiche, a salad, heart-shaped biscuits, a rum cake and the items that our friends brought for the brunch. With mimosas and bloody marys for beverages.
The recipe was actually really easy and I put everything together the night before and baked it the following morning. Here is the recipe; it is not in anyway healthy:
1 1/2 dozen glazed doughnuts
1 quart heavy cream
2 cups milk
10 large egg yolks
2 large whole eggs
1/2 cup sweetened condensed milk
1/2 cup brewed espresso, chilled
cinnamon and sugar
First, I preheated the oven to 250 degrees. While waiting for the oven to heat up, I cut the doughnuts into 6 pieces and placed them on a parchment-lined baking sheet. I then baked the doughnuts for 30 minutes.
Next, I mixed together the cream, milk, egg yolks, whole eggs and condensed milk. I put the doughnuts into a baking dish and then poured the liquid mixture on top. I then covered the dish and put it in the refrigerator overnight.
The next morning, I preheated the oven to 350 degrees, sprinkled cinnamon and sugar on top and baked it for 40 minutes.
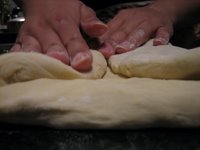
 Here are some pictures of the rest of the food.
 Biscuits
 Fruit salad
New Beginnings
Well I hope for new beginnings, anyway. This last week, I was busy finishing my applications for graduate school. It's been a difficult, multi-year process (studying and taking the GREs, finding my academic reference and professional references, finding the schools and programs that I want, writing my applications, etc.) Not so difficult in the process; it was just difficult to get myself motivated. I am happy to report that everything has now been submitted. Now I just have to wait for the results.
During this whole process, my inclination towards procrastination manifested itself in cooking. The good part was the food itself. The bad part was that there are no pictures because I was too busy/guilty to take pictures.
However, I would like to recommend a couple of easy, very satisfying dishes for when you're stressed and need to take time out for yourself. My friends like to point out that I'm still insane and that these recipes are still very time consuming. But these are dishes that I find infinitely satisfying and things that I find myself craving when I've had a hectic week and haven't had time to cook anything for myself.
The first is the easiest and best roast chicken recipe that I have ever encountered. It's so good, in fact, that I haven't really tried another one since I found this one. It easily feeds 6-8 people if you also serve it with a pasta and a vegetable. The leftover meat is a great base for chicken salad, soup or simply a roast chicken sandwich. Anyway, here it is, Marcella Hazan's Roast Chicken with Lemons:
A 3-4 lbs. chicken
Salt
Pepper
2 small lemons
First, I preheat the oven to 350 degrees. Next, I wash the chicken and patted it dry. Then I mix some salt (about 2 tsp. or so) and freshly ground black pepper (half as much pepper as salt) in a small bowl. Then I rub the chicken with the salt and pepper, making sure that I cover the inside and outside. Then I wash the lemons and dried them and puncture holes (about 20 all over) in them with a fork and stuff the lemons into the body cavity of the chicken. Afterwards, I place the chicken in a roasting pan, breast side down, and place it into the oven for 30 minutes. Then I turn the chicken over and cook it for another 30 minutes. After 30 minutes, I increase the temperature of the oven to 400 degrees and cook for another 30-45 minutes. (I use an instant-read thermometer to make sure that the thigh of the chicken has reached 180 degrees to make sure everything is done.) That's it. To serve, I carve the chicken and spoon on some of the pan juices for a simple gravy.
With this dish and depending on my mood, I will serve pasta, plain rice or mashed potatoes. I'm not really a mashed potatoes kind of girl, so I usually go for pasta or rice. A great pasta recipe, actually the one that is listed in the first entry is Pasta with Butter, Tomato and Onion Sauce also from Marcella Hazan:
A 28 oz. can of whole, peeled tomatoes (I recommend the Whole Foods Brand)
1 onion
5 tbs butter
Salt
Pepper
I dump everything in the can into a saucepan or skillet, and crush the tomatoes with my hands. (I try to puncture the tomato with a finger before fully crushing it so I don't spray myself with tomato juice.) Then I cut the onion in half and peel it and place it into the pan with the tomatoes. Then I put in the butter. I turn the heat on the pan and cook the sauce on a slow, steady simmer for 45 minutes. After it's cooked, I take out the onion and stir in salt and pepper to taste. I usually serve the sauce with whatever pasta I have on hand with more pepper and some parmesan cheese grated on top.
I also usually serve whatever vegetable I have on hand as well as a salad. One thing my mom did drill into me was the notion that you always had to have a lot of green stuff on the table. A simple salad with lettuce and onions and a great salad dressing is really all I need. One of my roommates, however, is the queen of salads and always does great combinations with cucumbers, tomatoes, peppers, etc. I love it whenever she has the time to make one for us. If it's up to me, though, simple is the switchboards.
I do however, insist on making my own salad dressing. It's not as complicated as it sounds and always yields great results. My basic vinaigrette comes from Patricia Wells' Paris Bistro, which calls for:
2 tbs dijon mustard
2 tbs red wine vinegar
Salt
Pepper
1/2 cup peanut oil
I mix the mustard and vinegar together and add salt and pepper to taste. Then I slowly drizzle the oil into the bowl while I whisk everything together. The resulting emulsion will last on the counter for a several weeks. It's enough to use for 2 salads.
The recipe is infinitely variable. I've used all of these ingredients in exchange for the listed ones and have never been disappointed: olive oil, balsamic vinegar, mustard powder, orange juice - One is only limited by one's imagination.
Cooking in the New Year Part: 1
This past weekend was a very busy one for me. Besides making bread, I also made several slow-cooked recipes. I love long weekends because you have the time to make some really interesting things. I was really craving stews and other sorts of comfort foods.
On Sunday, my roommate and I made a Moroccan meal. I have loved Moroccan food ever since I visited the country last November with my boyfriend, his sister, and two of my housemates. My boyfriend got sick about 2/3 of the way through our trip. While we were never sure if it was the food that made him sick or if he had caught a really bad cold, he had since developed an antipathy for the food. After about a year, he mentioned to me that he was ready to try Moroccan cuisine once again. I was very excited since my other roommate and I had brought back preserved lemons and saffron (not to mention cinnamon, paprika and copious amounts of pottery) from Morocco.
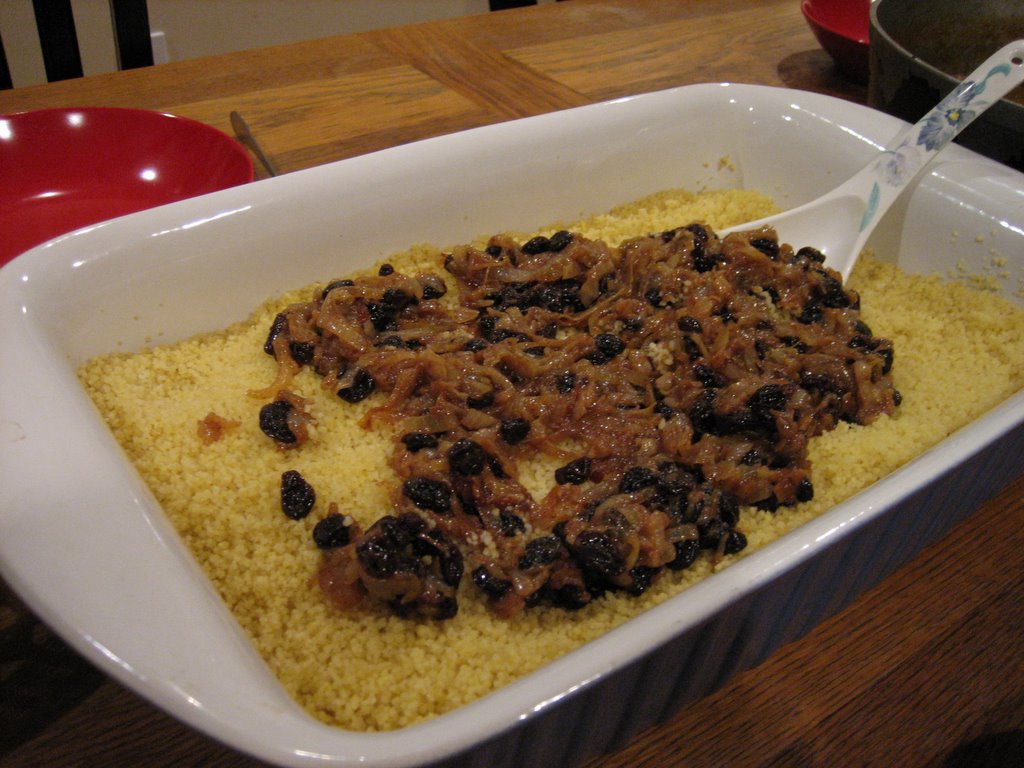
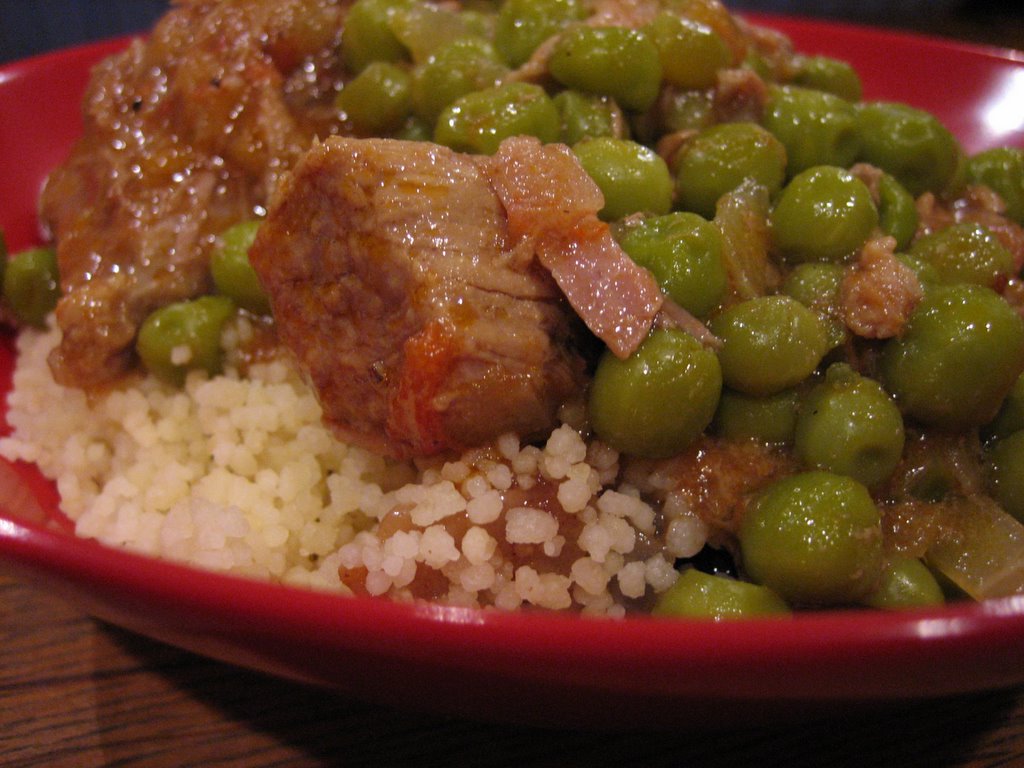
I had tried some recipes from Claudia Roden's The New Book of Middle Eastern Food before and really enjoyed them so I was excited to try her Moroccan dishes. I made a tagine of lamb, peas, preserved lemons and olives and my roommate made a couscous with honeyed carmelized onions and raisins.
The recipe for the tagine called for:
2 lbs. lamb meat cut into chunks
2 tbs vegetable oil
1 onion, chopped
salt and pepper
1 tsp ground ginger
pinch chili pepper or chili flakes
1/4 tsp saffron
4 cups fresh or frozen peas
2 tomatoes, peeled and chopped
Peel of 1 preserved lemon
12 green olives
This was a very easy recipe. I placed the meat, oil, onion, salt & pepper, ginger and chili pepper flakes in a pot and covered everything with water. Then I covered the pot and cooked the mixture on low heat for 1-1/2 hours until the meat was tender. Next I added the tomatoes (I used frozen chopped tomatoes that I had stored from this summer).
I peeled the preserved lemon and cut the peel into thin ribbons which I then stirred into the stew with the peas and cooked for a further 20 minutes without a cover to reduce some of the liquid while my roommate finished up the couscous.
The couscous recipe called for:
4 cups couscous
4 cups warm water
1/2 - 1 tsp salt
3 tbs vegetable oil
2 1/2 lbs onions, cut in half and thinly sliced
2 tbs butter
1 tbs olive oil
2 tbs honey
1 1/2 tsp cinnamon
1 cup raisins, soaked in water for 20 minutes
Roden recommended an interesting way of preparing the couscous. First, my roommate preheated the oven to 400 degrees Fahrenheit. Then he distributed the grains in a wide, oven safe dish. He added the salt into the water and gradually stirred it into the couscous until it was completely absorbed. Next, he fluffed the mixture with a fork to break up the big clumps. After 10-15 minutes, he added the vegetable oil and rubbed the couscous and oil mixture with his hands to break up any other clumps. He then placed the dish into the oven, uncovered, and heated it for 5-7 minutes and fluffed it again with a fork.
He then prepared the honey carmelized onion and raisins mixture. He placed the sliced onions in a pan with 1 cup of water, covered the pan and cooked the mixture on low heat for 1/2 hour. Once the liquid evaporated from the onions, he added the butter and the olive oil and cooked the onions until they were golden brown. After, he added the honey, the cinnamon, the drained raisins and a pinch of salt and cooked the mixture for a further 10 minutes or until the onions become carmelized and brown. When the onions were cooked, he spread them on top of the couscous.
 It was a one bowl meal with tagine spooned over the couscous.
 All in all, I think that Roben's book provided some very authentic recipes. The flavors of both the dishes called to my mind several wonderful meals that we had in Morocco. I would love to make some of the more interesting dishes in the book, like the cheeses or the yogurts but those will have to wait for another day. And the verdict from my boyfriend was that it was very good.
Happy New Year!
My New Year's Eve was actually a lot of fun. Sometimes, I feel that there is a lot of pressure to find a great party, a truly romantic night, an evening that will stand out from the other 364 evenings of the year, which can lead to a lot of disappointment. This year, my friends and I attended Lobster Boy's New Year's Revue at the Warehouse Theater. It was a wild night of vaudeville and burlesque acts. The Warehouse Theater and Cafe is reall a second home to my housemates and I. We know most of the people who work there and Molly and Paul Rupert have always been so nice to us.
Before the evening started, however, I spent the day in the kitchen, determined to master breadmaking. In the past, I had joked with my friends that I killed yeast with my bare hands, which was pretty much true since I had never made any bread that wasn't small, hard and inedible. This year, my boyfriend's parents got me The Bread Bible by Beth Hensperger for Christmas. I decided that I would start out with the easiest recipe, White Mountain Bread:
3/4 cup warm water (105-115 degrees Fahrenheit)
1 package active dry yeast
1 pinch sugar
1 1/2 cups warm milk (105-115 degrees Fahrenheit)
3 tbs melted butter
3 tbs honey
1 tbs salt
6-6 1/2 cups all purpose flour
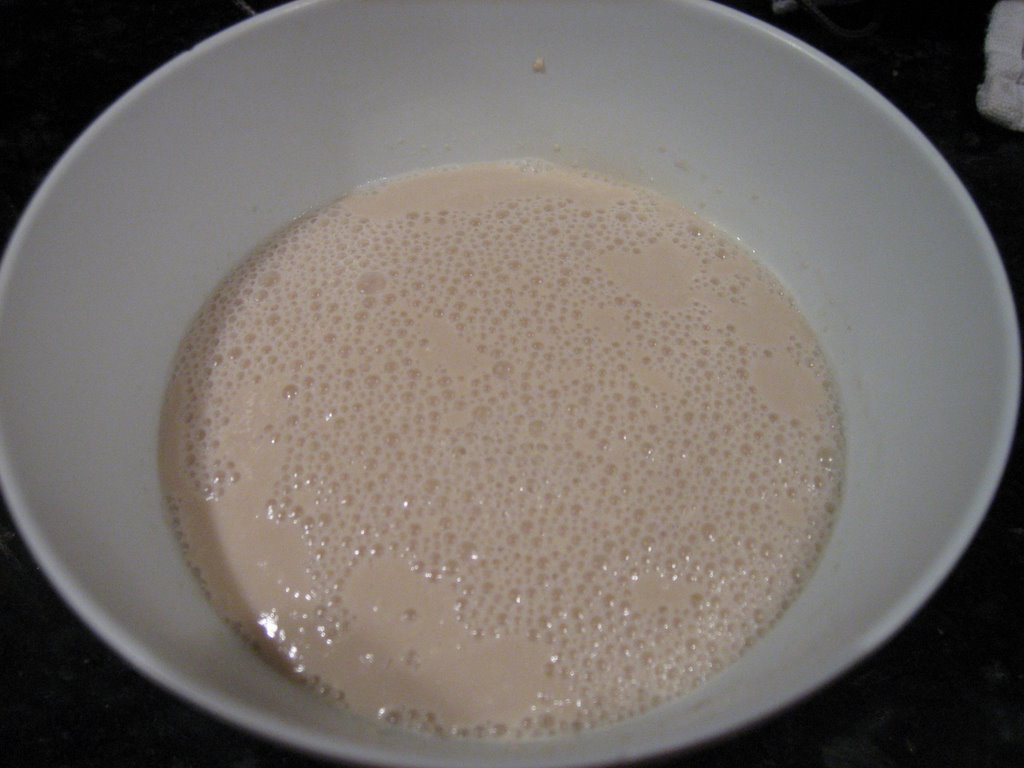
To get things just right, I turned to the food-geek methods of Alton Brown, using my instant-read thermometer to precisely measure temperature. To start, I heated the water in the microwave. The book suggests using bottled water, which considering the taste and content of DC tapwater, I thought was a good suggestion. I then mixed 1/4 cup of the warm water with the yeast and sprinkled it with sugar. I then whisked the mixture and let it stand at room temperature while I assembled the other ingredients.
 Next, mixed together the rest of the water, milk, honey, salt and 1 cup of the flour. I beat this mixture well for about 3 minutes and then stirred in the yeast mixture. After that, I started incorporating the rest of the flour, 1/2 cup at a time. I eventually had to switch from a whisk to a wooden spoon. Once the mixture creates a soft dough that pulls easily from the side of the bowl, I dumped it out onto a floured countertop and started to knead the dough for 4 to 7 minutes until it was smooth a springy to the touch. Next, I set the dough into an oiled bowl, turned it over, covered it with plastic wrap and a kitchen towel and set it in a warm dark place to rise. (In my house, the best place in is in the downstairs half bath.)
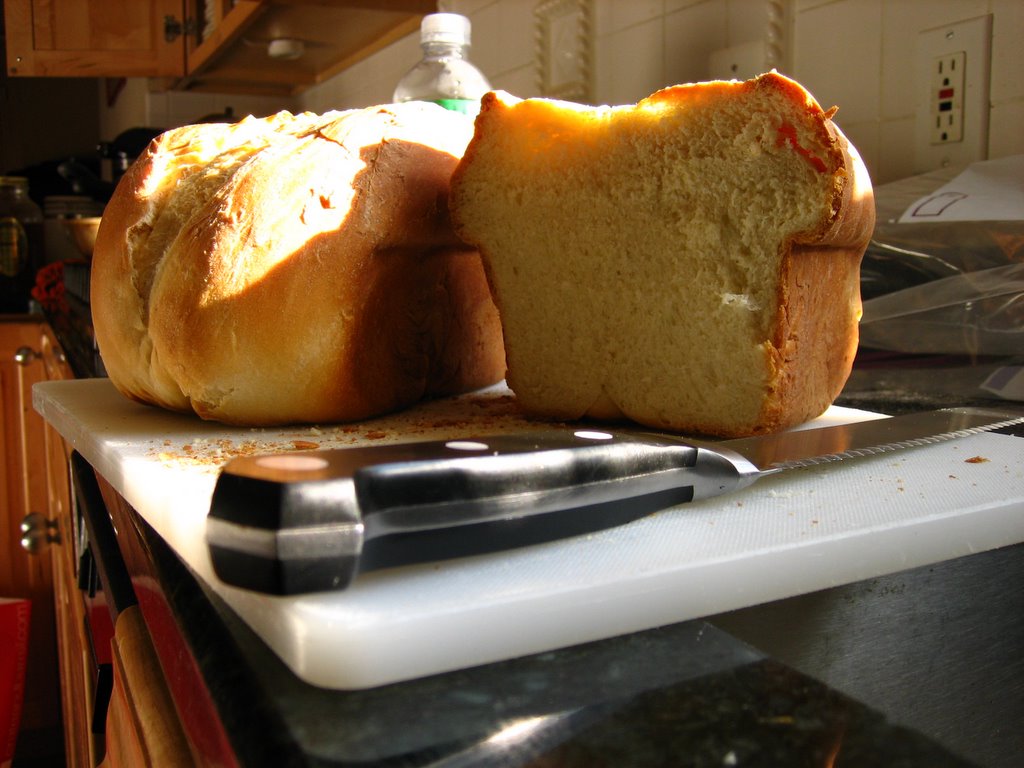
After 1 to 1 1/2 hours, when the dough has doubled in size, I took it out. (Another way that I could tell the dough was ready was that when I pushed a finger into it, the indentation stayed in the dough.) I deflated the dough gently and cut it into 2 pieces.
 I formed these pieces into loaf shapes by flattening the dough out into a rectangle, folding the two longer sides into the middle and rolling the folded dough. After rolling, I pinched the edges closed and placed the loaves into oiled bread pans.
 I covered these pans with plastic wrap and a kitchen towel and allowed the dough to rise once more for about 45 minutes until the loaves had doubled in size. Next, I slashed the top of each loaf, placed them into a preheated 375 degree oven and baked them for 45 minutes. To my surprise, when I tapped on the sides of the loaves, they did produce hollow sounds.
I allowed the bread to cool on a rack. After a few hours, I cut into it and was surprised by how good it tasted.
 Overall, it was a pretty easy recipe. It was definitely time consuming and you really do have to pay attention to the amounts and procedures. (Unlike my usual method of cooking where I throw everything together and estimate amounts until it tastes right.) But the end result was a very nice sandwich bread that tasted great with butter and jam.
UPDATE: I tried the recipe again a couple of days later and had not so good results. The difference? I substituted bread flour for all-purpose and I just didn't really take as much time as I needed to. (I think I also forgot to add salt.) The result was an ok bread, it did not rise as beautifully as my first loaves nor did it have as good a flavor. I am not discouraged, however, and will definitely try again soon. I might actually take a look at Alton Brown's baking book to get some pointers. His recipes are ok but he's great for technique.

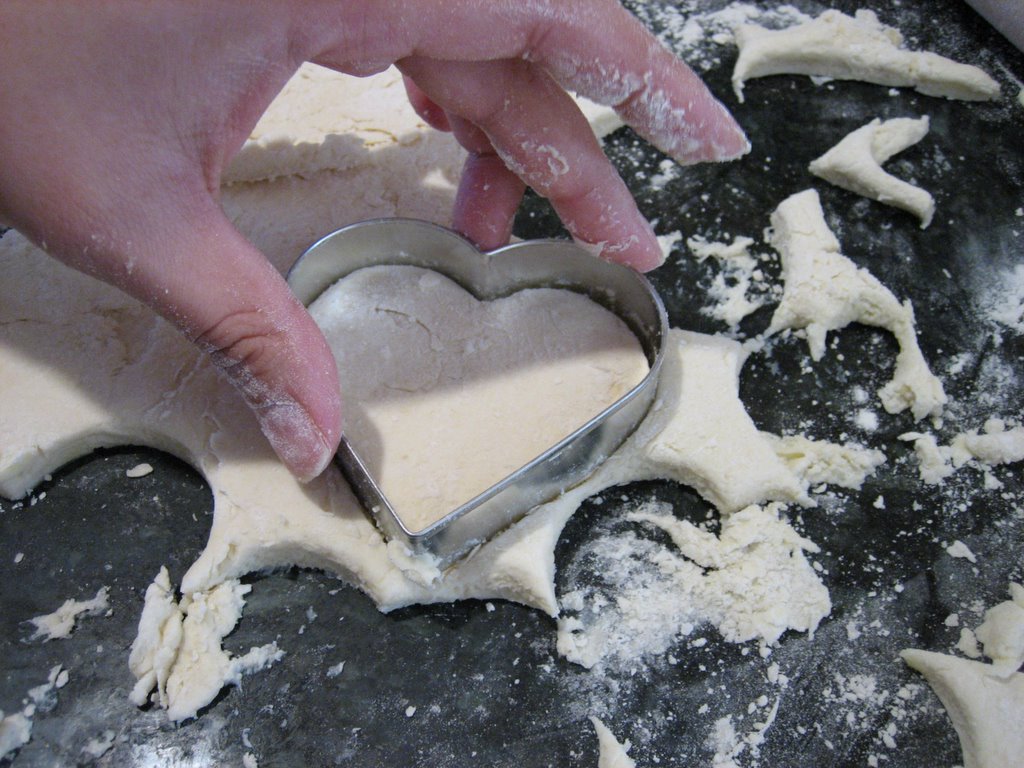 Biscuits
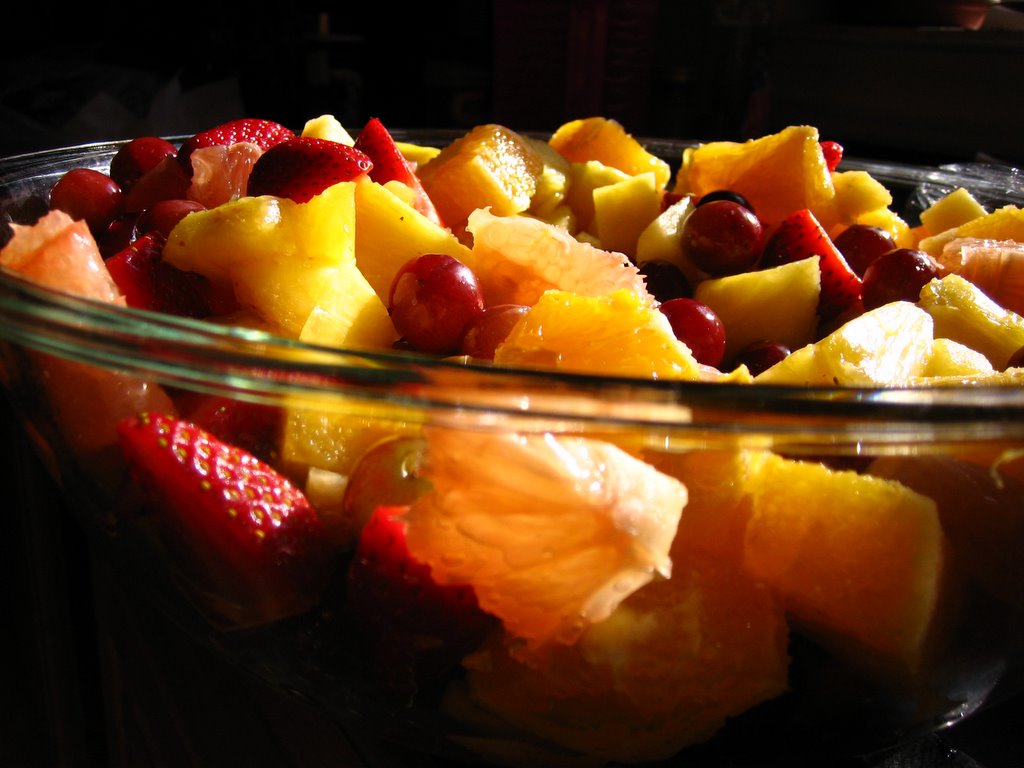 Fruit salad